Friday, October 11, 2013

Using cheap flashes for professional photography

I have always loved flashes more so than any other accessory in my camera bag. Flash changed my photography thoroughly and for the better.

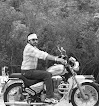
The following are the pictures I shot with a single Canon 430 EX flash. Its, TTL, very capable and very consistent. This flash is available for $321 new and for $169 used on Amazon. Ofcourse you can get away with using any other cheap flash and still achieve the same result.    


For more pictures please go to my page on facebook 'StudioVii" and please like the page, if its not too much to ask. Thank you :)

How I shot these?
The camera I had on me was a Nikon D200, with the 430 EX flash (NOT Canon 430 EX II) bounced to the ceiling  at 24mm, effectively making it a huge softbox/lightsource. White balance cloudy. f around 4 or 5 I think. Btw these pictures haven't been edited in anyway except cropping a bit.  I did take an elinchrome D-lite II it strobe head with me but didnt feel the need to use it as the pictures with flash were already good enough. 

Ok in the middle of things, I apologize to my dear readers if they feel my posts are a little autobiographical, that comes from my past career as a copywriter. I personally think a little bit of background story would make anything worthwhile to read J so that’s that.

A few days back I visited my local camera market (by local I mean its approx 30km from where I live) to buy a sensor cleaning kit. While I was there I asked the shop assistants to show me some cheap flashes. They showed me couple of Vivitar flashes both under $15. Yes under fifteen dollars. Bingo !!!! That’s it I thought, what if I coupled with them with some cheap flash triggers and made my own lighting system? Viola !!! that would be amazing. Since they cost under $15 I wouldn’t even have to worry if they break. The caveat? They are completely manual flashes, no TTL.  That is fine by me.


Vivitar in their hey day made excellent affordable flashes, they do now as well. Now the brand is owned by a company called Sakar International. Vivitar brand was owned by many companies in the past. Their 285HV is now a legend. It was prized by both professionals and amateurs It is still manufactured in this day and age. It’s available for approx $82 on Amazon, but comes even cheaper if bought used or on fleabay.

Not just Vivitar there are many other cheap no name flashes available for $15-$100 in the market today. Whatever you buy make sure it is reliable.  Personally I feel hundreds of $$$ for a flash is a ridiculous idea, but if you are on the OEM branded flashes side, then you can still buy the Nikon SB range and Canon speedlite flashes in the used market for much much less.


Time to talk about the Yongnuo flashes. How can one post an article about cheap flashes without talking about Yongnuo? haha. It’s a Chinese company and has been making lot of things apart from flashes. Their range of flashes are a hit in the amateur market. Their recent offerings are the cheapest TTL flashes and are available through their online store.  


So are there any downsides to using cheap flashes?, yes sure, but the positives far outweigh the negatives. Here I list some concerns.
  •     Most of these cheap flashes do not have TTL . a TTL flash will save you time, shutters and guesswork. Get a cheap flash that has TTL instead of an all manual flash, your problems are solved.
  •     Some of the older flashes due to their high voltage output may short circuit the internal mechanics of your DSLR. So do your research when using an older flash.
  •     Reliability is ofcourse an issue. These cheap $15 flashes may suddenly stop working in the middle of a shoot, so having one or two of these as a back-up is always a good idea.
So the big question – “Can you use cheap flashes for professional photography? Absolutely Yes. The difference in light between a $15 flash and a $500 flash is almost zero. Yes you can go ahead and buy that $15 flash. Cheers and happy clicking.

Here is a review of my cheap Vivitar 3200A auto thyristor flash:

http://subliminalwhispers.blogspot.in/2014/05/vivitar-3200a-auto-thyristor-flash.html

      --Viisshnu--


Monday, July 1, 2013

Nikkor 18-70 ED DX lens review


I recently had the good fortune of buying a ‘as good as new’ Nikkor 18-70 from a local seller at a reasonably low price. I was really tired of the ‘amateur’ 18-55 VR. Though its not a bad lens and produced some not so bad results, I was longing for a professional (atleast looking) lens for my D200.


I read a lot of reviews for this lens before buying it and most of them were positive. Some called it Nikon’s mistake. It’s selling around $300 online.


My gripe with the 18-55 was that it had no ED. Inspite of the fact that how much difference it made to the final image, having ED etched on the lens barrel makes it look better. It also came with a hood. I shot both casually and professionally with this lens and it has delivered decent results.


Build quality is much much better than the 18-55 VR. The front element diameter is 67mm. Its 3.5 at wide end and 4.5 at the tele end. It weighs substantially more than the 18-55.  

I also read that this lens was supplied with the D70 as a kit lens a while back. As far as I know the lens is not in production anymore.

I used this lens exclusively for a product/merchandise shoot for a Mumbai based client a few weeks back.  Here are some pics from the lens. All shot with the D200.


Sunday, April 21, 2013

Tripod DIY - Repairing or Making Your Own Quick Release

The Vivitar VPT-3600 Tripod

When I bought my Sony a200 DSLR the shop owner promised to give me a free tripod and I got it after a few days. The catch? It had no quick release plate or the fastening latch. I kept it unused for a long time. Recently I figured I could use it as a light stand and also put an umbrella adapter for full fledged use in the studio.

This model is made by Vivitar and is called the VPT-3600. It is retailing for INR 2,250 on ebay brand new. This model is very light and can be used as a travel tripod.  

After some more time I realized I can make the quick release myself. So I studied a lot of things online but nothing seemed to help. Unfortunately tripods come in variety of sizes and configurations. So do the quick releases as there is no universal standard in their size and function.

Slot for the Tripod quick release plate

I briefly even considered making the quick release by making a wooden cast and melting some plastic but realized that would be too much of a hassle and I didn’t have the tools or the expertise.
I figured the tripod is salvageable after all.

The Vivitar logo and mostly faded model name

I drew up the schematics and dimensions of the top plate.
I still haven’t made it, but sharing the info. Will soon put up the pictures or may be a video lets see.

What I am using is:
  1. 3 screws to fix the wood plate
  2. Some metal and rubber washers
  3. A ¾ inch hard aluminum (ideally somethign hard like a metal)top plate that will sit on top of the wooden plate
  4. A ¾ inch piece of wood with a thickness of 1 ¼ inch
  5. A ¼ inch bolt that will into the bottom of the camera.     
If you have a carpenter’s workshop in your area you can get it done or volunteer to do it yourself, but be careful while working the vice, saws and drilling machine.

to be continued....

Tuesday, April 16, 2013

Studio Lighting Setup For Photographer On A Budget


translucent shoot through umbrella 

Firstly, I would like to begin by saying that all or atleast most of the photography lighting equipment and gear out there is very expensive. I cannot emphasize enough on photography and lighting as they are two sides of the same coin.

After checking out the prices of photography light kits online, I decided to put together my own DIY style photography lighting setup. Its been a long time now since I have been thinking about it and I wanted to setup my own cheap, unique and effective lighting system under a budget. So I started asking, looking around and found many inexpensive solutions.  

In Hyderabad, where I live, like everywhere else, photo goods are expensive as hell. I originally wanted to put together a strobe/flash system but after much calculations realized it will cost me nearly INR 30,000 (approx. $550) for all the lighting and related accessories. 30,000 for me is not a small amount. So I started considering other options i.e cheap manual/semi automatic flashes instead of strobes. Remember if you are buying strobes you will also have to buy sturdier stands to support their weight. With flashes you don’t have that problem. 

Btw this article is NOT about Strobes Vs Flashes, but Expensive Vs Inexpensive lighting.
I feel using a flash system instead of the strobes is not only economical but it is also very portable. Can you put strobe lights in your cargo pants? I don’t think so haha. 

I did look for information on many online forums before preparing this lighting setup. We shall compare flash system with the strobe system in relation to their cost and related accessories.

A pair of elinchrome strobes on stands with soft boxes

Here is a list for the costly strobe system:

       1.Two Prolinchrome strobes – INR 18,000
       2.Two stands – INR 3,000
       3.Two reflective or shoot through umbrellas – INR 300
       4.Two simpex triggers – 1,200
       5.Umbrella mounts for stand – INR 700
       6.Cables/connectors – INR 3,000

This is just a basic list. With some more accessories the total cost of the setup will come to nearly INR 30,000.

Lets see how we fare with the flash setup we have devised.

Note: The all manual Yongnou flashes have no TTL or iTTL but you can use them to trigger other flashes/lights/strobes in Pilot/Commander/Master mode. All you need is appropriate camera settings. I am mentioning Yongnou because they have good reviews online. Some of their latest models do support TTL. You can add your own favorite brand in the list. Btw the Yongnuo YN560-II at just $77 is a great flash gun.


Yongnou 560EX flashgun (pic stolen from Yongnou site)

Some photographers swear by proprietary flash guns from Canon and Nikon. Its their opinion. The supposed quality itself does not justify the high price of these flashes that cost more than two strobes. Both Canon flash and Nikon flash are extremely expensive. Nikon’s Speedlight SB-910 and Canon’s 600 EX-RT Flash guns both cost INR 33,000+. Yes, a single flash gun from Canon or Nikon costs almost as much as 4 strobes. Yeah ! its crazy expensive and also ridiculous. But if you are really crazy about proprietary flashes then you can buy them on the used market for much less. 


Remember there many even thousands of inexpensive flash gun brands like Yongnou, Polaroid, Vivitar, Metz, Nissin and many many unknown brands. The mechanics inside any flash is almost same, so there are very much repairable and salvageable if they give trouble or anything.     


Sigma flash

With this list we are trying to go as low as possible money wise. If you have some more bucks you can choose accessories with more/better specs.

        1.Two Yongnuo manual flashes - INR 4,000
        2.Two Yongnow triggers – INR 2500
        3.Two reflective or shoot through umbrellas – INR 300
        4.Two light stands – INR 1400
        5.Umbrella mounts for light stand – INR 700

       The costing of this list is coming to a grand total of INR 8,900.

       So with this photography lighting setup you are saving INR 21,100 (approx $383). Yes a huge amount indeed. This setup is extremely useful for a small studio that is primarily into portrait photography.

Light stands

You can buy pro gear when you start making money off of your assignments, until then you have to make do with what you have and get creative.

When you are working with manual/inexpensive flashes like Yongnou or Vivitar etc you have to understand their limitations and have to turn these limitations into your advantages. On that note I would like to add that there is no shame in being poor and having no money for expensive gear. It’s really the disadvantages that teach you great lessons. In life you have two options, either you can drown your problems with a truck load of money or learn to work with your limitations and turn them into learning opportunities, creating, developing ingenious ideas and having lot of fun along your journey as a photographer.

Godspeed.....


Monday, April 8, 2013

Lowepro Photo Traveler 150 (Mica) Camera Bag Review


The Lowepro Photo Traveler 150 Mica on a chair. 
I put it on a chair so you will have a better idea about its size/scale.

I really never wrote any camera bag reviews but seeing as it is, I thought may be this will be useful for someone.  Firstly to begin with, this is a very small bag. I mean a tad bigger than a lunch box.

Before buying this camera bag, I would carry my gear in a normal backpack with my jacket as padding. Yeah I was that poor and stupid when I began my career as a photographer. Don't do that. Its unprofessional. It can put your gear at risk. I also used to think I didn’t need a dedicated camera bag. What a fool I was. But I had to buy one. 

Inside the Lowepro Photo Traveler 150 Mica bag. 
The empty space you see is where I kept my Nikon D200

So I started searching camera gear sites for suitable, affordable bags with different features. I wanted to buy something below $60 (Approx.INR 3000). I didnt have too much of gear. Just two camera bodies and a few lenses that is all. So after searching a lot I finally found the Lowepro 150 Mica (INR 2499) to be a suitable one on flipkart.com. I was impressed with all the things I saw crammed in it. In the pictures and videos the bag looked big enough, so I placed an order. It came almost after 2 days from Bangalore which is fast enough. I opened the box and was shocked.

The bag is just a little bigger than a normal lunch box. I considered sending it back after I tried to fit in my D200 and it was difficult.  I called up the site but they wouldn’t take it back. I also posted an ad online but ZERO responses. Heck, may be its destiny. I decided to keep it anyway. I unpacked all my gear from the sleeve they were in and one by one tried to put in all my gear, which isn’t too much. I realized, to fit in my gear, I had to remove/adjust some compartments. I did. Slowly one by one, to my own surprise, I managed to cram every piece of equipment I had into this camera bag, which is a wonder in itself.

This is what all I put in
  1. Nikon D200 with 18-55 lens
  2. Nikon battery charger
  3. Nikon batteries – 2 nos
  4. Sigma 28-105 lens
  5. Sony a200 camera body
  6. Sony 18-70 lens
  7. Sony battery charger
  8. Sony battery   
   In the top panel  
      :
1 . Sony HDMI cable
2 . A multi card reader
3 . Sony power cable       
4 . Nikon power cable
5 . One CF card
6 . Business cards


There is a provision for a pen/lens pen in the top panel. My only gripe is that there is no more space for a flash gun, but wait a second...viola I can put the Canon 430 EX in the top panel just below the zipper. May be I could also cram it in somewhere in the main compartment if I am a little clever, will try that after a bit. In the main compartment, to adjust and utilize the space I put my Sony a200 and the Sony kit lens 18-70 separately.

The quality of the bag is very good. It’s well stitched, well zippered, well planned. Size is the only deal breaker. There are so many other bags so much bigger and at half the price. I feel $50 for a bag of this size is way too much money. The only consolation is the quality. This bag is strictly for amateurs who have minimal equipment.


Friday, March 29, 2013

Going full frame on a budget with film cameras


I wrote many articles on film photography and cameras before. With a recent increase in the usage of high-end (and also costly) full frame cameras I wondered if guys with small pockets had any choices. Ofcourse they do.


Film photography is cheap, output is qualitative and within the reach of common man. 
Given the prices of high end cameras like Nikon D3x (almost $8000) and Canon 1Ds Mark III (almost $7000), there has never been a good time to choose film photography. Inspite of the shortcomings of film, the advantages far outweigh the heavy price tags of the aforementioned cameras. It is of note that no matter how high-end a DSLR is, it can never replicate the cinematic aura of the film camera.


Even in this day and age of digital saturation there still some purists who shoot on film. A certain percentage of top tier fashion photographers still shoot film. Terry Richardson shoots with a Yashic T4, Miles Aldridge shoots with a Rollieflex, I don’t exactly know which camera but David Bailey too shoots exclusively on film and there are many others like them.


 If your primary professional work demands speed then film photography isn’t for you. Modern journalism is a bit difficult with film, but for magazines like National Geographic where the assignment time is several months, film photography may be most suitable. 


For any up and coming fashion photographer money is the most important criteria. Instead of investing thousands of dollars on camera bodies additionally some more thousands on the subsequent lenses, it is wiser to start off with a good reliable film camera system. The lenses too for film cameras come very cheap. Choose a good system and you are as good as your friend with the 1Ds Mark III. 


No matter how expensive a digital camera can never deliver the color rendition of a film camera. A while ago I read somebody’s quote that capturing all the information on the film frame will generate a image file of 1500MB (That’s 1.5GB) and that means shooting with a 500 megapixel camera. Just think about it. 


When buying a film camera see to it that you buy something that has/supports auto focus lenses. This way it will save some valuable time, when it is factor. 
 

You can easily learn film processing and also setting up your own dark room very cheaply. Digitizing film is also not rocket science. You can do it with a good capable computer and scanner system


The whole point of this article is not to tell you to throw away your digital cameras, but only to tell you that there is also an economical alternative to full frame DSLRs.


And remember, without curiosity, inspiration and imagination no matter how high end camera you have, you are just a guy in the middle of the ocean with no sails.    


Happy Clicking.


--Viisshnu Vardhan--


Wednesday, March 20, 2013

Good Lenses for Fashion Photography


Offline or online there is no definitive answer as to what particular lenses we need to do specialist jobs like fashion photography. Some prefer zooms and some primes. Out of these two, prime lenses seem to have better sharpness, though I haven’t tested or compared the two.

They say it’s the photographer not the lens. Yes its true for some jobs but for specialist jobs like fashion, jewelery etc. gear matters a lot.

Since the last few weeks I have been doing an enormous amount of research online (where else) on lenses suitable for fashion photography. Since I am primarily a Nikon shooter I will list out some Nikon lenses here. The same equivalent focal length and aperture lenses are available in Canon, Sony and Pentax as well. 


Firstly I would like to remind you that these specialist lenses do not come cheap and may cost hundreds of dollars or even more than a thousand dollars. You CANNOT do fashion photography with cheap lenses like the 50mm 1.8D because it will ‘show’ on the picture. The optical properties, optical formula, coating on these lenses is not as good as expensive lenses. Doing fashion photography with a 50mm 1.8D may work sometimes in some lighting conditions but you may not always be lucky. Don’t count on your luck, get the better lens. 

Even though these expensive lenses are a bit of a financial strain you will have invest in them. Over a period of time these lenses will pay for themselves and they are a better investment than camera bodies.


Unfortunately to make matters worse, even Nikon does not mention what kind of lenses it has for fashion, the classification of their lens selection is pretty generic.

As a reference I had a few month old Nikon lens catalogue along with a price list. I painstakingly started researching each lens and what kind of pictures it produced and went through thousands of pictures on both flickr and 500px. My main criteria were color reproduction, sharpness and contrast. NOT price.

The G (Gelded, with no aperture ring) series lenses somehow seem to have a bit low quality and low color reproduction.       

So time and again, during the course of my research I have been coming across a few lenses and they are popping up on various forum discussions. I have mostly listed primes as zooms are considered a bit soft and not so sharp. 


           AF Nikkor 20mm f2.8D – Though not entirely practical for fashion but possibly feasible, the 20mm lens can be used for wide outdoor shots. Color rendition is superb as is edge to edge sharpness. After this one the 24mm f2.8D, 28mm F2.8D and 35mm F2 follow up in focal length but are not good at all, so better skip these three. Price: INR 32,335/-


          AF Nikkor 50mm f1.4D - The catalogue says quality optics, superb resolution, color reproduction and fine detail. It is mostly true. The pictures I have checked out on flickr confirm this. A great lens for portraits. Can be used for body shots in a mid size studio. Price: INR 16,000/-


          AF Micro Nikkor 60mm f2.8D – The catalogue describes this lens as crisp and it surely is. This is also a great portrait lens as it comes to around 90mm on APS-C cameras. Note that this is designated ‘Micro’ that means a real macro lens from Nikon, flowers bees, you know the drill. Price: INR 25,180/-


           Nikkor 85mm f1.4D IF – This is ‘the’ lens to have for fashion photography. Everything else is an excuse. Melissa Rodwell swears by this one. Both the color rendition and sharpness are amazing. Internal Focus. Surprisingly, for some strange reason this lens is not listed in the catalogue I have. Price: INR 67,000/-


           Nikkor 85mm f1.8D – The catalogue says crisp, natural image reproduction with high contrast. Though not that bad a lens to have, definitely not as good as the 85mm 1.4. The only consolation is the sharpness and the price. Price: INR 23,785/-


          AF DC Nikkor 105mm f2D – This is a Defocus Image Control lens which means you can control the soft focus in the foreground and background. The sharpness and bokeh on this one are out of this world. Just get this one. Price: INR 57,215/-


          AF DC Nikkor 135 f2D – This one too is a Defocus lens and has excellent sharpness and color rendition. It costs 10k more for the extra reach in focal length and at f2 is reasonably fast. Price: INR 67,165/-


Though this list not exhaustive, it pretty much covers from wide angle to telephotos. Readers can also suggest other lenses with samples if possible, that will help other people as well. One or two or three lenses from this list will get you started. To save money you can buy lenses during festive offers with special discounts, rent them if you don’t have the money or pool some money together along with some like minded photographer friends to buy it or borrow it from some one who is not using them.

Goodluck and happy clicking J

--Viisshnu--